Showing posts with label Visual Studio. Show all posts
Showing posts with label Visual Studio. Show all posts
Tuesday, 17 May 2011
The page you are trying to view cannot be shown because it uses an invalid or unsupported form of compression.
I get this error from time to time when editing plain text files in Visual Studio. I tried correcting it by going to File, Save As, Save with Encoding (in the Save dropdown). This seemed to do the trick about 50% of the time. However, it would seem this was just coincidence. Latest findings suggest it is a Firefox cache problem. I tried the same URL in another browser and it worked. Fingers crossed this is a fix.


Tuesday, 17 November 2009
The solution is offline because its associated Team Foundation Server is offline
When opening a solution in Visual Studio 2008, I kept getting the following message in the Output window:
I kept having to go into the "change source control" and re-bind the solution. After a while, this began to get annoying. Then I found this post: http://www.eggheadcafe.com/software/aspnet/33487526/connecting-automatically.aspx. It turned out the solution was to set some registry keys. I navigated to HKEY_CURRENT_USER\Software\Microsoft\VisualStudio\9.0\TeamFoundation\Servers\ and changed "Offline" to 0 and "AutoReconnect" to 1. I've no idea how these got reset! (Please back-up your registry first if you want to try the same.)
This solution is offline.  [Team Foundation Server:
http://server:8080/]
The solution is offline because its associated
Team Foundation Server is offline.
I kept having to go into the "change source control" and re-bind the solution. After a while, this began to get annoying. Then I found this post: http://www.eggheadcafe.com/software/aspnet/33487526/connecting-automatically.aspx. It turned out the solution was to set some registry keys. I navigated to HKEY_CURRENT_USER\Software\Microsoft\VisualStudio\9.0\TeamFoundation\Servers\
Tuesday, 28 July 2009
Enable XSLT IntelliSense within Visual Studio
Wouldn't it be nice to have Visual Studio list the available template names when typing out a call-template statement in XSLT? Wouldn't it also be nice to have it list available parameter names when typing out a with-param statement?
To enable these autocompletions and more, you need to back up your registry and then run regedit. Within regedit, create a string value called "XsltIntellisense" under "HKEY_CURRENT_USER\Software\Microsoft\VisualStudio\9.0\XmlEditor" key, giving it the value "True". That's it!
Ultimately, I'd like to see full IntelliSense for XSLT in Visual Studio, but this is a good start.
To enable these autocompletions and more, you need to back up your registry and then run regedit. Within regedit, create a string value called "XsltIntellisense" under "HKEY_CURRENT_USER\Software\Microsoft\VisualStudio\9.0\XmlEditor" key, giving it the value "True". That's it!
Ultimately, I'd like to see full IntelliSense for XSLT in Visual Studio, but this is a good start.
Thursday, 18 December 2008
Visual Studio External Tools Menu
Further to my post about setting up Windows Explorer as an external tool within Visual Studio (http://www.neilpullinger.co.uk/2008/03/open-visual-studio-project-folder-in.html), I have set up a number of other tools set up in the same way. Here's my list now:
I've excluded a couple of the others that are there by default (eg. Create Guid and Dotfuscator).
(Edited 19/12/2008)
| Title | Command | Arguments | Notes |
|---|---|---|---|
| Run test | (full path to nunit.exe) | $(ItemPath) | |
| Reflector | (full path to reflector.exe) | $(ItemPath) | |
| FxCop | (full path to fxcop.exe) | $(TargetPath) | |
| Explorer | (full path to explorer.exe) | /e, /select, $(ItemPath) | |
| Open in Notepad | (full path to notepad.exe) | $(ItemPath) | |
| Open | (full path to a batch file containing just "%1") | $(ItemPath) | |
| Error Lookup | (errlook.exe, in VS\Common\Tools folder) | (none) | Not sure where this one came from; installed by default? |
| Spy++ | (spyxx.exe, in VS\Common\Tools folder) | (none) | Installed by default |
I've excluded a couple of the others that are there by default (eg. Create Guid and Dotfuscator).
(Edited 19/12/2008)
Tuesday, 8 July 2008
Creation of the virtual directory http://localhost/ failed
On attempting to check out a project in VS2008, I got the following message:
The local IIS URL http://localhost/ specified for Web project DemoWebsite has not been configured. In order to open this project the virtual directory needs to be configured. Would you like to create the virtual directory now?
On clicking yes, I got the following error:
Creation of the virtual directory http://localhost/ failed with the error: The URL 'http://localhost/' is already mapped to a different folder location.
The rest of the solution checked out all right, but the above project did not; it was marked as unavailable. I right-clicked the project node in the solution explorer and selected the option to edit the project (.csproj) file. Near the bottom of the file, I found the following:
<iisurl>http://localhost/</iisurl>
I edited this entry to add a virtual directory:
<iisurl>http://localhost/myapp</iisurl>
Having saved the change, I then right-clicked the project node in the solution explorer again and reloaded the project. When I was prompted to create the virtual directory again, the creation was successful and the project checked out. The virtual directory is created under the running web site in IIS (on Windows XP).
The local IIS URL http://localhost/ specified for Web project DemoWebsite has not been configured. In order to open this project the virtual directory needs to be configured. Would you like to create the virtual directory now?
On clicking yes, I got the following error:
Creation of the virtual directory http://localhost/ failed with the error: The URL 'http://localhost/' is already mapped to a different folder location.
The rest of the solution checked out all right, but the above project did not; it was marked as unavailable. I right-clicked the project node in the solution explorer and selected the option to edit the project (.csproj) file. Near the bottom of the file, I found the following:
<iisurl>http://localhost/</iisurl>
I edited this entry to add a virtual directory:
<iisurl>http://localhost/myapp</iisurl>
Having saved the change, I then right-clicked the project node in the solution explorer again and reloaded the project. When I was prompted to create the virtual directory again, the creation was successful and the project checked out. The virtual directory is created under the running web site in IIS (on Windows XP).
Wednesday, 23 April 2008
System.OutOfMemoryException during Visual Studio 2008 build
Just recently, Visual Studio 2008 kept failing with a System.OutOfMemoryException when doing a build. The problem seems to have been due to inadequate Windows virtual memory. I upped the value of the paging file and, so far, have had no further exceptions.
... 1 hour later... whoops, spoke too soon. A re-installation is now taking place.
[Edit 2/5/2008: Still no luck. I have noticed that massive amounts of data are generated in the temporary ASP.NET files folder (C:\WINDOWS\Microsoft.NET\Framework\v2.0.50727\Temporary ASP.NET Files). The other day, VS created over 3Gb of data in there when building a solution that was only 187Mb in size. Might be part of the problem.]
... 1 hour later... whoops, spoke too soon. A re-installation is now taking place.
[Edit 2/5/2008: Still no luck. I have noticed that massive amounts of data are generated in the temporary ASP.NET files folder (C:\WINDOWS\Microsoft.NET\Framework\v2.0.50727\Temporary ASP.NET Files). The other day, VS created over 3Gb of data in there when building a solution that was only 187Mb in size. Might be part of the problem.]
Saturday, 29 March 2008
Open Visual Studio Project Folder in Windows Explorer
Visual Studio 2008 has this feature already built in. If you’re still using VS2005, it’s easy to add:
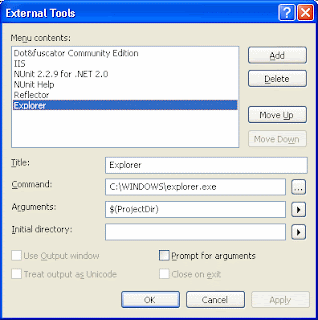
Select Tools, External Tools to bring up the External Tools dialogue box. Enter a title in the title field. In the command field, enter the path to the Windows Explorer executable. In the arguments field, enter $(ProjectDir) or select Project Directory from the side menu. Your dialogue should look as follows. Click OK.
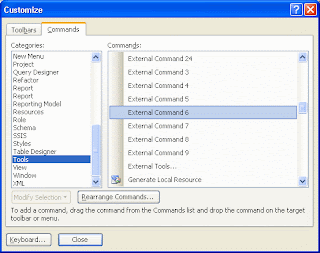
You could leave it there. You can now click on a project in Solution Explorer and select Tools, External Tools, and pick the item that you added. Windows Explorer will open at the project’s location. To make things even slicker, add the external tool as an item on the tool bar. To do this, right-click on the tool bar and select Customize. In the left-hand pane of the dialogue box, select Tools. In the right-hand pane, select the item you added and drag to the tool bar. This is tricky as the tools are just shown as External Command 1, External Command 2 and so on. You will need to work out the number assigned to yours.
Once you’ve dragged the right one to the tool bar, you can give it a name and icon as you like by right-clicking on it again (still in Customization mode) and tweaking the settings.
Select Tools, External Tools to bring up the External Tools dialogue box. Enter a title in the title field. In the command field, enter the path to the Windows Explorer executable. In the arguments field, enter $(ProjectDir) or select Project Directory from the side menu. Your dialogue should look as follows. Click OK.

You could leave it there. You can now click on a project in Solution Explorer and select Tools, External Tools, and pick the item that you added. Windows Explorer will open at the project’s location. To make things even slicker, add the external tool as an item on the tool bar. To do this, right-click on the tool bar and select Customize. In the left-hand pane of the dialogue box, select Tools. In the right-hand pane, select the item you added and drag to the tool bar. This is tricky as the tools are just shown as External Command 1, External Command 2 and so on. You will need to work out the number assigned to yours.

Once you’ve dragged the right one to the tool bar, you can give it a name and icon as you like by right-clicking on it again (still in Customization mode) and tweaking the settings.
Wednesday, 19 March 2008

Subscribe to:
Posts (Atom)